

How To Install Outdoor Spotlight
How to Install Outdoor Lighting and Outlet
Underground wiring puts lite and power anywhere in the yard. Nosotros'll testify you how you can do it easily and safely.
![]() Time
Time
A total day
![]() Complexity
Complexity
Intermediate
![]() Cost
Cost
$101–250
Introduction
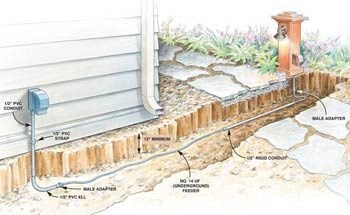
Run an underground electric line into the garden to power an outdoor light. Here'due south the quickest and cheapest method for bringing ability to a remote spot without fierce upwards your yard.
Tools Required
Materials Required
- Mattock
- Trenching shovel
Say you need a bright yard light fashion out in your yard or a remote outlet to power a pond pump or electric tools. By far the best way to get electric ability right where you demand it is to run underground 'line' voltage (120-volt household current). All information technology takes is a picayune electrical moxie and a willingness to dig a shallow trench.
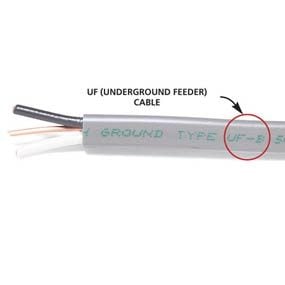
In this commodity, we prove the easiest, quickest and cheapest method to safely run electricity outdoors. Our method involves direct burying UF (hugger-mugger feeder) plastic shielded cable 12 inches below footing level. We'll also show you a no-sweat mode to run the line under a walkway and how to hook upwards the wiring at both ends.
For this project, you should take the fundamental wiring skills it takes to make proper connections and the bones electrical and carpentry tools. While they're not crucial, a trench shovel, a mattock and a sledgehammer volition make the trench piece of work easier and faster. Allow well-nigh a day to complete this project, assuming you collect all the parts in advance.
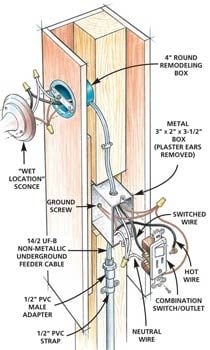
In our project, we run a line from an existing outdoor outlet on the house to a light and receptacle at the edge of a garden path. It incorporates a combination light switch/outlet. The outlet is e'er hot, and the switch controls only the light. If you don't have an outdoor box to tap in to, consider installing one on your house.
You tin can expand the projection to include additional outlets, switches and lights. The techniques for running the wire and mounting electrical boxes are the same. Even so, make sure not to overload the circuit.
While we enclosed the electrical boxes within a hollow post, y'all can just mountain a weatherproof box on the side of a 4×4, as long as you protect the cable by running information technology in conduit from the trench bottom to the box.
Project stride-by-step (16)
Step ane
Tap into House Wiring
- Determine where you want the electrical mail positioned and then find the nearest existing outlet to supply the power.
- Note: That outlet must exist GFCI protected.

Footstep 2
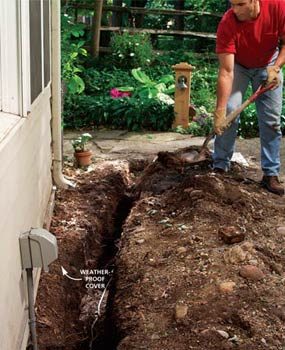
Mark the Route and Dig
- Marking the cable road from the power source (house outlet) to the position of the remote outlet with spray paint.
- Telephone call the utility companies to mark any underground lines.
- Get an electric permit, either from your local building inspections department or a land function.
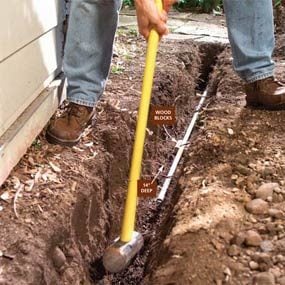
- Dig a 12-inch deep trench connecting the two points and the 2-foot deep posthole for the low-cal.
- Pile the dirt on a strip of plastic side by side to the trench.
- Pro tip: Requite copse a wide berth to avert chopping through roots. Approach sidewalks or paths at right angles for easier tunneling and make certain to program a 3-foot long directly section of trench on one side of the walkway. That's so y'all'll have room for driving the conduit below it.
- Subsequently the trench is finished, dig a posthole at the end of the trench near 2 anxiety deeper than the trench to receive the light pole post.

FYI for GFCI
To make sure the "feeder" outlet y'all choose is GFCI protected, look for the characteristic GFCI buttons, or if information technology'south a standard outlet, cheque it with a GFCI tester. Standard outlets withal may be GFCI protected past being linked to some other GFCI outlet elsewhere in the house. If yours isn't protected, simply supervene upon the standard outlet with a new GFCI outlet using the techniques we bear witness in Photo thirteen and Figure A. Another option is to cut in, mount and wire a new outside GFCI outlet, feeding it from an outlet mounted on an inside wall in the house. Sometimes that'due south easier than excavation a long trench to a more than distant power source.
You also have to make sure the new outlet/light won't overload the circuit yous tie into, and that the box is large enough to handle the additional wire. To determine whether the excursion you want to apply can handle the boosted electrical demand, first shut off the circuit in the primary console. Then go through the house turning on lights and other electrical items. Add upward the wattage of everything that stays off (the items on the excursion). Then add on the wattage of the mail service light plus the wattage of items continuously powered by the outlet. Nosotros recommend a maximum connected load of one,440 watts for a 15-amp circuit and i,920 watts for a twenty-amp circuit (the amperage is stamped on the breaker or fuse). If the total wattage exceeds these amounts, find a dissimilar circuit. If yous're not sure, telephone call in a licensed electrician to help with this function.
![]()
Step 3
Run Conduit Under the Sidewalk
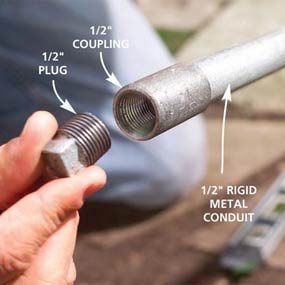
- Bulldoze 1/ii-inch rigid metal conduit under the walkway with a sledgehammer.
- Pro tip: Never use "thin wall" conduit, which corrodes apace, or plastic conduit, which is too weak.
- Protect the ends with fittings (lower photo) and lay forest blocks in the trench to continue the conduit clear of the trench bottom.
Stride 4
Push the Wire Through
- Replace the conduit fittings with plastic bushings.
- Lay the UF cable in the bottom of the trench and push button the cable through the conduit.
- Notation: Wire rated for cloak-and-dagger use carries a postage on the jacket (lower photo).
- Cut it to length, leaving 3 feet of extra cable at the post pigsty and at the outlet.

Footstep 5
Assemble the Parts
- Turn off the circuit breaker to the house outlet.
- Test it to make sure it's dead and disconnect it.
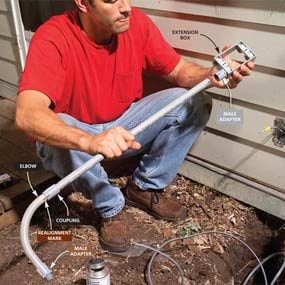
- Cutting to length and dry-fit the PVC parts, then glue upwards the assembly.
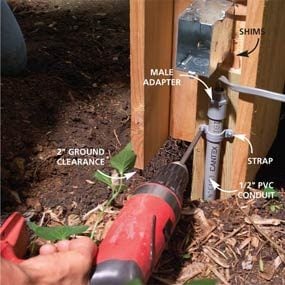
Step 6
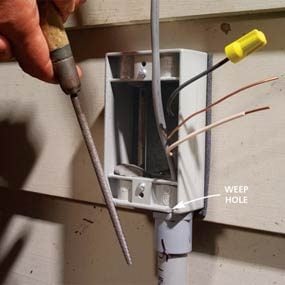
Bring the Cable to the Power Source
- Feed the cablevision through the conduit and screw the outside extension box to the existing box.
- Fasten the conduit to the siding with a strap and file two ane/8-inch deep weep holes at the lesser of the box.
Step 7
Partially Preassemble Your Light Post
- Partially preassemble the light mail before information technology's wired then you can stick it in the ground and have full access to the interior for stapling wires and making the hookups.
- Pro tip: Only make sure that the low-cal fixtures you cull are rated for "wet location." You'll notice that designation on the fixture box.
- Test-fit the fixture on the post before cutting the hole for the round electric box to brand sure information technology clears all of the trim.
Step viii
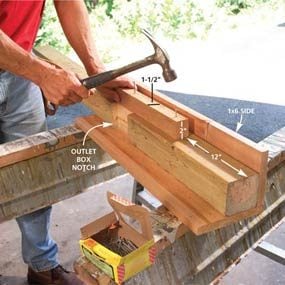
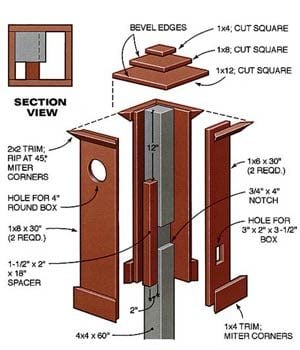
Notch the Mail
- Cut a iv-inch tall x ane/2-inch deep notch in the 4x4 x 60-inch post.
- Nail two sides and a 1-1/2 ten ii-inch nailer to the post as shown.
- With a jigsaw, cutting the hole for the circular electrical box in the 2d 1x8 and nail it to the post assembly.
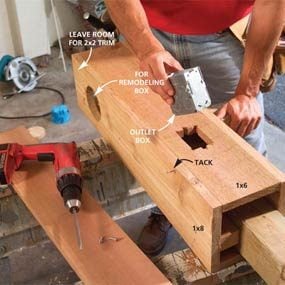
Step 9
Cutting Holes for the Electrical Boxes
- Trace and cut the hole for the outlet box in the 2nd 1x6.
- Tack the 1x6 to the sides, and then slip the box through the hole and spiral it to the notch.
- Shim out the box if needed, and then remove the 1x6.
Step x
Set the Post
- Fix the post associates in the hole and adjust the height
- Make full and pack soil around the post bottom.
- Assemble and glue the plastic conduit parts.
- Run the cablevision through information technology and strap information technology to the post.
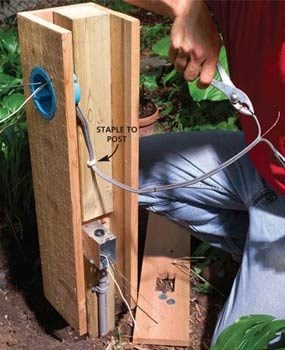
Step eleven
Fasten the Light Box
- Install the light box and run a cable from it to the outlet box.
- Insert both cables and fasten them to the outlet box with cable clamps.
Step 12
Add the Low-cal Fixture
- Finish the wood trim on the mail.
- Hook up the light fixture following the manufacturer'due south directions.

Step 13
Wire the Switch
- Connect the switch/outlet with 6-inch 'pigtails' for the neutral and ground.

Step 14
Install the Weatherproof Cover
- Mount the gaskets and screw special weatherproof covers over the switch/outlet for this projection.

Step 15
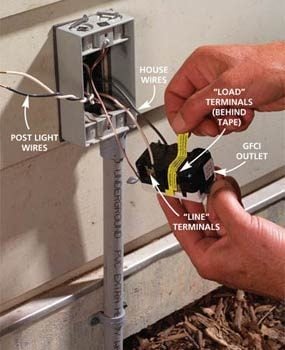
Connect to the GFCI Outlet
- Connect the hot and neutral wires leading to the post to the "load" terminals on the GFCI.
- Connect the house wiring to the "line" terminals.
Step sixteen
Finish Up
- Add a weatherproof embrace to the house outlet.
- Fill the trench afterwards the electrical inspection.
Electric Connexion Tips
- GFCI outlets have two sets of terminals, "line" and" load". Line is for the incoming wires from the ability source, and load is for the switches, outlets and fixtures that it supplies. Don't wire it improperly or users won't be protected against shocks caused past damp footing or standing h2o.
- Cut and dry-fit all of the PVC parts. Before taking them apart for gluing, draw alignment marks on each joint. That manner you'll get them back together in the proper orientation.
- Apply "duct seal" putty to the bottom side of the top hub plugs in the extension box at the house. That volition continue h2o from entering the box.
- The male adapters and plastic bushings on the ends of pipes are to protect the cable from the sharp pipe edges. They're not but required but also a skillful idea, so don't skip that step!
Originally Published: December 31, 2022

Source: https://www.familyhandyman.com/project/how-to-install-outdoor-lighting-and-outlet/
Posted by: cruzhiscre.blogspot.com
0 Response to "How To Install Outdoor Spotlight"
Post a Comment